Monday, October 20, 2008

Walking Through Our Project - "Ain't Got You" - Part 1

When you open up Finale, you will either see the Launch Window, in which case you will select Setup Wizard (on the left of the window) or go to File->New->Document with Setup Wizard.

Either way, choose Setup Wizard.

  1. Start with “Create a New Ensemble” on the left. Then choose “Handwritten Style - Jazz Font”. This is a larger font and easier to read in a lead sheet or chart. Click “next”.
  2. Now, you’re on the Add Instrument page. Start with Keyboards on the left, choose Piano and click “Add>”. Click “next”.
  3. On the Score Information page, fill in whatever information you want. Click “next”.
  4. You are now at Score Settings. Choose the appropriate settings for your song - time signature, key signature, tempo and pickup measure (if necessary) and number of measures if you wish. All of these can be changed later, by the way. For this project, we're using 6/8, key of G, no tempo or pickup. Click “next”.

You are now set up to begin your chart. You will have a staff system that goes on horizontally, with a piano track to the left of each clef, and a tempo tap track above those. It will be called ‘Untitled #1’ or some other number depending upon how many untitled files you’ve started.

Right now - SAVE YOUR FILE!


Navigation:

You will want to navigate to a place that you want to save your file to.

Use the key command “command-S”. Always use a key command if one is available. This will bring up a “Save As” window. By default it will say “Untitled #1.mus” = .mus is the Finale extension. ou will choose the name you want to save it as. If the arrow to the right of the Save As: title is pointing down, click on it to open up your navigation window, and find a place to save it. t could be to your flash drive, or on the computer - either in Documents or Music. When you get to either one of those, you can create a folder of your own to keep your files in by using the New Folder button on the bottom left, and then click Save (or, better yet, use Enter on the keyboard) to save your file.

You are ready to start working on your chart.First, let’s get familiar with the tools we will be working with the most that are in your Main Tool Palette. These are:

The Selection Tool - first on left, dotted square with arrow.
This tool is the one you will be using the most for selecting, copying and dragging different items around. if you click on an item that is specific to a tool, such as a repeat sign, a chord symbol, a note, etc., that tool will become selected and you can work with it.

The Simple Entry Tool - the one that looks like a single upright eighth-note (not the speedy one that is slanted with little lines on it - that’s Speedy Entry and we’ll get to it later.) This is the tool you’ll use to enter notes into the staff, either by clicking on the staff directly or clicking on a number and a letter key on your computer keyboard.

The Staff Tool - this one looks like a measure with a treble clef in it. This is one you’ll be using a lot - it controls things like putting slashes and rhythmic notation into your measures that have only chord changes in them. For a simple chart or lead sheet, there will be a lot of this.

The Measure Tool - this tool will get some use, too - you can use it to add different kinds of bar lines to different sections of the song; also you can drag the handles to make the measure wider or narrower.

For now, that’s enough to get you started.

There are also some important keyboard shortcuts you need to know.

For Simple Entry -

Number Pad: the number pad on the right of the keyboard is used with the Simple Entry Tool to determine what length of note you want to use. When you’re in Simple Entry, each number corresponds to a note value - a quarter note is the number 5, an eighth note is the number 4, a sixteenth is the number 3, a half note is the number 6, etc. So if you want to enter a half note, the first thing you would do would be to press 6 on the number pad. If you look at the Simple Entry palette, you would see the note value change around as you press different numbers.

Then, you would have a couple of different options for entering your note. If you wanted to enter a C half -note, you could press 6 on the number pad and then the letter C on the computer keyboard. Or, you could press 6 and then use the mouse to select a C on your staff. It’s up to you which method is fastest for you.

Navigation Arrows: the arrow keys directly to the left of the number pad help you navigate through your measures and notes in Simple Entry. If you have entered a note, you can use the up and down arrows to move the note up and down on the staff, and you can use the left and right arrows to select notes to edit. You can also use the up and down arrows with the Shift key to change the octave of a note you’ve selected.

Letter Keys - can be used to enter the corresponding note letter names along with the number keys which determine note value.

Plus and Minus Keys - these keys will make a selected note sharp, flat or natural, depending upon the key signature. Plus (+) key moves a note one half-step up, minus (-) key moves a note one half-step down. Can be used from the number pad or the regular keyboard.

Dotted Notes can be created by adding the decimal point on the numpad or the period to a number selection for note value - in other words, pressing 3 plus the decimal will give you a dotted sixteenth.

Read on...

Walking Through Our Project - "Ain't Got You" - Part 2

Okay. We now have a blank chart ready to go.

This is going to be a simple chart at first, with mostly chord changes.

Whe we sketched the chart out on manuscript paper, we counted out the measures for each section - intro, verse, pre-chorus, chorus. Then we wrote in the chord changes for each section. We found that the intro and the chorus had the same changes, so that saved some work right there.

Our goal is always to save work whenever we can!Now, we're ready to start entering data in Finale.

Our chart is going to have slashes with chords over them in the treble staff, and bass notes in the bass staff.

Let's start with the Intro.

The intro is 8 measures long. We're going to start by entering in bass notes.

We enter notes with the Simple Entry tool, so click on that.

Our chord changes for the intro are: CMaj7 | Bmin7 | Amin7 | GMaj7 |CMaj7 | Bmin7 | Amin7 | GMaj7 |

So, we're going to enter the roots of those chords as bass notes.

In the first post, we talked about using the Number Pad to choose note value. We want the note value to be a dotted quarter, so we will press 5 and then the decimal (dot). When you choose the Simple Entry tool, your cursor becomes a note of the value you have chosen with a vertical line through it, called a 'caret'. Point your cursor to beginning of the first measure in the bass clef (not the treble, where it probably wants to go) and then press the letter 'C' twice on the computer keyboard. If all goes well, you should end up with this:

Congratulations!

Read on...

Walking Through Our Project - "Ain't Got You" - Part 3

So...

We have entered our first notes in Finale!

Let's continue entering bass notes - Bs in the second measure, As in the third measure and Gs in the fourth measure.

****Now, let me take a minute here to talk about using your key commands.

When you work in Finale (or write a chart by hand for that matter), always look for patterns that can be repeated. This is how you work fast and efficiently (and also avoid carpal-tunnel syndrome!)

In the intro, if you look back to the last post, you can see that the chord changes repeat themselves after the first 4 bars. So, instead of entering the notes by hand, you can copy them two different ways.

Let's start at the beginning, with Select.

'Select' is computer-speak for anything that you pick to work with. You can 'select' in many different ways and with many different tools, but it is the same function. In order to change any item, it must be 'selected'. When an item is selected, there is usually an obvious visual cue to let you know what has been selected - it may be highlighted with a color, it may have a box around it, or little dotted lines, but you will be able to tell by looking at it that it is selected and therefore able to be modified.

When you select text, for instance, in a Word document or any other word processor, it is highlighted. You know then that you can change the color or size or font, or add a link to it or underline it or change the formatting to bold or italic, but only what is highlighted is affected - nothing else. It's the same thing in Finale.


The Selection tool is the all-purpose tool for selecting items in Finale. You can click and drag to enclose anything you want to work with. Also, while using the Selection tool, if you click on an element of your chart, such as a chord or a note or a repeat, it will activate the tool that is associated with that item. Click on a chord, and it will bring up the Chord Tool.

When you click on a measure, it will highlight to show you that it can be worked with. A very useful and important key to use with selection is the Shift key.

Shift/Select:

When you want to select a region of measures, but you don't have the screen real-estate to fit them all inside the selection box, you will want to use Shift/Select. Here's how it's done:

First, you select one measure -


Then, you hold down the Shift key and click on the last measure that you want as part of your selection -


and all the measures in between are selected.


Now, we have two choices. We can either copy and paste, or drag-copy, meaning you click on the selected area and drag it into the next open measure, which will show a dark black border to let you know where you're dragging it to. Either way, you have copied the four measures.


Now the bass line for the intro is complete.

Read on...

Walking Through Our Project - "Ain't Got You" - Part 4

Next, we are going to learn how to add chord changes with slashes.

The tools we'll be using will be:

Select Tool


Staff Tool


Simple Entry Tool


Chord Tool


It is a good idea to get familiar with both the tools and their icons, so that when you want a certain tool, you can go right to the icon on the Main Tool Palette.

We’ll start with the intro, which is 8 bars long.
Choose the Simple Entry tool.

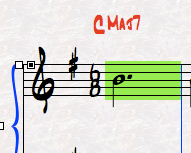
The first thing we’ll do is add ‘dummy notes’ to each bar. ‘Dummy notes’ are notes that are not played, but are added to the measure when you use slash chords so that you can attach chord symbols to them in the right rhythm.

Finale will not let you add chords without anything to attach them to, so in each measure we will put some random notes. You should figure out how quickly your chords will change, and on what beat, so you can choose the right note value for your ‘dummy notes’.

For instance, if you have a measure where the chords change every beat in a 4/4 measure, you would need to put quarter-note dummy notes. If the chords land on 1 and the ‘and’ of 2, then you would need to put a dotted quarter and an eighth note in the measure.

Random Fact about Simple Edit
- you can change any note in Simple Entry into a rest by pressing ‘R’, and then change it back into a note by pressing ‘R’ again. You can attach a chord to a rest that is changed from a note, but not a rest that is there because nothing has been entered into the measure - in other words, a default rest. These are two different kinds of rests.

So...

Back to our chart.

Since our chords only change once a measure in the intro, our ‘dummy notes’ can be a dotted half. If they change twice in the measure, as they will in the ‘B’ section, then we will use two dotted quarters.

Using the Simple Entry Tool, press 6 on your numpad (Number Pad) and then a decimal or a period. This will give you a dotted half.
Make sure the cursor (colored note with a vertical line through it) is positioned in the treble clef of the first measure, then press Enter. You will see the dotted half-note entered in the first measure, and the cursor moved forward to the next measure.


Remember, these are dummy notes - it does not matter what pitch they are at all, becasue you will neither see nor hear them.

Continue to press Enter until you have a dotted half in all 8 measures.


Now, it's time to switch tools. Let's choose the
Chord Tool.

The chords for the intro are: ||: CMaj7 | Bmin7 | Amin7 | GMaj7 :||

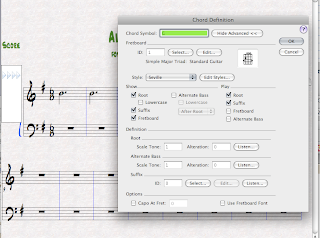
Click on the Chord Tool, then double-click on the first dotted-half note. (In the Chord Menu to the left of Help, make sure that Manual Input is selected and not Type Into Score.) The Chord Definition window will show up:

There are several ways you can enter chords here. The most obvious is to type the name of your chord into the box that says Chord Symbol. For this demonstration, we're going to use the Definition section of the window.

In the green selection box, you can see that it says 'G'. This is the default, as it always starts off on the root of the key of the song - in this case, G. (Thank you, Professor Einstein.) But in the Definition part of the window, you can see that it says 'Root', and then 'Scale Tone' and 'Alteration'.

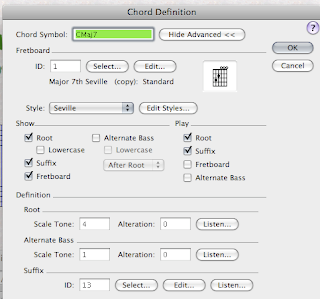
Our first chord is not G, but C major 7. So it is asking us for the scale tone of the chord we want. C is the 4th tone in the G major scale, so we would enter 4 for Scale Tone.


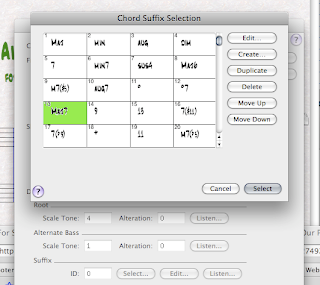
Then, we need to add Major 7, so we go to 'Suffix' and click Select...

which brings up the Chord Suffix Selection window. We select the suffix we want (#13, Maj7) and click Enter.


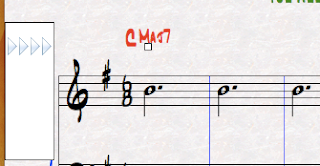
Now, when we look at our Chord Symbol, it's what we want - CMaj7. We click Enter again, and our chord appears above the dotted half note, just where it's supposed to be!

The group of 4 arrows to the left of the staff are used to position the chords higher or lower on the staff.


Slashes

Time to switch tools again to add slashes to this measure.

To explain slashes: They are a Staff Style, added by the Staff tool. What they do is 'cover up' whatever else happens to be in that measure - the measure objects (notes, rests, etc.) without deleting them. When you see a Staff Style in use, you'll see the slashes, but you won't be able to see what the slashes are covering up. I think of Staff Styles as sort of a curtain that hides what's behind it.

So - we switch to the
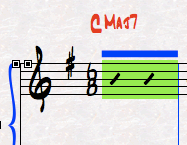
Staff Tool and click inside the first measure (the one we added the chord to) to select it.


Now, here's the cool part. Simply press the letter S on your computer (no modifier key.)


Lo and behold! The 'dummy note' has been covered up by slashes!

When you have selected the Staff Tool, any measures that have Staff Styles on them will show a blue bar above the staff to identify them.


"What if it won't let me add a chord?"


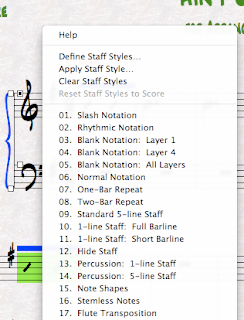
Dear friend, this is a common question, and the answer is almost always the same - you've tried to add a chord to a slash measure without knowing whether there are notes underneath the slashes! Remember, you can't add a chord to an empty measure. But you can add a Staff Style to an empty measure, so it's very likely that you have slash measures without dummy notes under them. The solution is to select the offending measure, then click on it while holding Control (also known as Control-Click.) This will bring up the contextual Staff Menu, at which point you will choose "Clear Staff Styles". While you're looking at the menu, notice all the different Staff Styles there are to choose from! In this project we will mostly be using Slash Notation and Rhythmic Notation.

Choosing "Clear Staff Styles" will do just that, and show you what's underneath, at which point you can add the dummy notes and then select and re-apply the slashes by pressing S again.

Now, do this with the other three chords, then copy the first four measures and paste them into the fifth.

You are now the proud owner of an intro!

Read on...

Sunday, October 19, 2008

We Interrupt Our Tutorial To Bring You This Very Important Message

Before we go any further, I want to impress upon you how useful it is to know the basic shortcuts - both in Finale and in computer programs (applications) in general. When you know them automatically, you will be amazed at how much quicker and more efficient your work is. And - time is money.

The Big Four - Copy, Paste, Cut and Undo

Most of you probably know these, but I want to start from Jump Street.

These are all paired with a modifier key - the Command key. It looks like a little four-leaf clover - ⌘. There are two of them, located on either side of the Space Bar. For a long time (in Mac Land) people called it the Apple key (“press Apple-C”) because it had a Mac apple on it next to the little clover-shape, but the latest keyboards have eliminated it, and it’s better to think of it as the Command key because that’s what it does - it gives commands when paired with another key. To use it, you press the Command key first and hold it down while you press the next key.

If you let up on the Command key before you hit the next key, it won’t work.

Copy - ⌘-C
Paste - ⌘-V
Cut - ⌘-X
Undo - ⌘-Z

Earlier, we talked about the Select function, which is the basic way we choose what we want to work with or modify. Once an item is selected, you can copy it, paste it somewhere else, or cut it. What exactly does this mean?

First, let’s talk about the Clipboard. The Clipboard is an invisible ‘holding area’ for items that have been copied or cut. If you select an item and then Copy (⌘-C) it, a copy of that item is stored on the Clipboard, and it stays there until something else is copied. Only one item at a time can be stored on the Clipboard, and if you copy something else, the new item will replace the one that was previously on the Clipboard.

So - once you have copied an item, the original item stays where it is, amd the copy is on the Clipboard. Think of it as being stuck on a bulletin board with a push-pin.

Now that there is an item on the Clipboard, you can use Paste (⌘-V) to place that copy anywhere else you choose. You can paste the same item over and over, because it will stay on the Clipboard until it’s replaced by a new Copy item. But you can’t Paste anything unless it has been stored on the Clipboard.

Now we come to Cut (⌘-X). Cut is like a combination of Copy and Delete. When you use Cut on a selection, like Delete it removes the original, but like Copy it puts a copy of the item on the Clipboard, which you can then Paste anywhere you like.

Finally, the Big Kahuna - Undo (⌘-Z)! You will fall down on your knees with gratitude for Undo - especially in Finale, because depending on how you set the program, there are unlimited Undos! So, if you make a mistake, or a few mistakes, or a complete and utter tsunami of mistakes, you can just ⌘-Z⌘-Z⌘-Z⌘-Z⌘-Z⌘-Z⌘-Z⌘-Z⌘-Z⌘-Z⌘-Z⌘-Z⌘-Z⌘-Z⌘-Z⌘-Z⌘-Z⌘-Z⌘-Z⌘-Z⌘-Z⌘-Z⌘-Z⌘-Z⌘-Z until you are back to where you did not make a mistake. Undo is the Supreme Lord and Master of all Command keys.

I’m going through all these basics because you will use all of these a lot in Finale, and soon you’ll wonder what you ever did without them.

If you start using these keys now, while you are just learning the program, it will become second nature and you won’t have to waste time switching from mouse-and-menu commands.

Remember - use a Key Command instead of the Mouse-and-Menu whenever you have that option.

Speaking of Option...
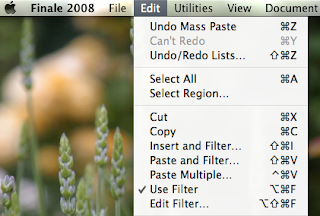
When you go to a Menu item with the mouse, if a function has a Key Command associated with it, it will display it next to the name of the function. Most people can recognize the Command symbol (⌘)- but what about those other weird ones?


Besides Command, there are three other modifier keys that handle most of the business. These are:


Shift -⇧

Control - ⌃
Option - ⌥


When you see them in a menu, sometimes it’s difficult to remember which keys the symbols correspond to. It took me a while, until I came up with some little memory-tricks to help me.

Shift -⇧ is fairly obvious, but I had to make sure not to confuse it with the arrow keys next to the Number Pad that we use to navigate around the staff.

Control - ⌃ is not as self-evident as Shift but since it’s closest to Shift on the keyboard, I grouped it with Shift as both being arrow-types that point upward.

Option - ⌥ was hard for me to remember until I thought of the word Op-Shun, a two-part word with the first syllable being accented in a higher pitch and the second syllable being lower-pitched, and then looking at the symbol, which is in two parts with the first part being ‘high’ and the second part being ‘low’. You may have some other way to remember it that works better for you, but finding a little ‘hook’ in the brain helps a lot.

Here is an example of how to use Copy, Cut and Paste.


We have two measures with notes in them. Now, we're going to Select the two measures:


and then Copy using (⌘-C). This will put those two measures in the Clipboard - the invisible bulletin board - but nothing looks different. The measures stay the way they were.

Next, we will deselect the first two selected measures (by clicking anywhere outside of the green selection area) and click on the 5th measure to select it.


Then, we will Paste (⌘-V) the contents of the Clipboard - which are the two measures we copied from the beginning of the piece - into that selected measure.


Voilà! How cool are you?!? It is so much easier than entering the notes by hand all over again. You might have noticed that even though we only selected one measure, it added both measures that had been Copied to the Clipboard once it was Pasted in. 

Now let's take a look at Cut (⌘-X).

We'll take the same six bars (I copied and pasted them, BTW):


and select the same two bars:


But....

Instead of Copying them, we will Cut (⌘-X) them. Like Copy, the two measures are now on the Clipboard. But, unlike Copy, the contents of the two measures will be deleted - at least to the naked eye.


Now, let's Select measure 3.


And Paste (⌘-V) the contents of the Clipboard into the selected measure!


Our two measures were not lost forever, even though they disappeared from view. That is the difference between Cut (⌘-X) and Delete (⌫ or ⌘-⌫ , depending upon the application.) If we had used Delete instead, it would have looked the same as Cut, but the measures would not have been sent to the Clipboard.

Some other useful shortcuts are:
Select All - (⌘-A) This command will select everything in the document you're working on. Great for clearing everything out and deleting everything if you want to start over, or making a complete copy (⌘-A, ⌘-C)of what you're working on to transfer somewhere else in the document, or Paste (⌘-V) into a new document - either in the current application (Finale) or to put into another program like a word processing application.

Save -(⌘-S) Fairly obvious, yet important. If you save often, you will not be caught with your pants down if there is a crash - your data will be safe. And you will be very, very happy.
Open -(⌘-O)> Also obvious, but useful.
Close Window -(⌘-W) Closes the document you're working on without quitting the program.

And, of course, the ever-popular...

Quit - (⌘-Q) Quits the program.

Print(⌘-P) No explanation needed.
Hide - (⌘-H) Makes your program temporarily invisible without quitting. Very useful.

Why am I making such a big deal out of key commands? Because of the impact they will have on your work, not just in Finale but any application. Music applications in general, such as ProTools, Logic, Digital Performer, depend on lots and lots of cutting, copying and pasting - also navigating around in very large documents. If you have to spend time going to the Menu Bar and going to the drop-down menus and picking the function you need, your project will take twice as long, and your mouse hand will suffer as well.

While we're really geeking out here, I'm going to take a minute and use some computer terms that are useful to know when you're talking to other computer people and want to sound like you know what the hell you're talking about. You will sound very impressive, and people may want to give you money and stuff.

Select, and selection, we've already gone over. But it's good to know the 'official' description.

Application
- when you're talking about a computer program, you call it an application. The word 'program' is usually used as a verb, meaning to write code.

Document -
the thing you're working on in your application. So, the chart you're writing is a document; the application that you're using is Finale.

Data - information of any kind, but usually referring to the information in your document.

When you're looking for a place to save the stuff you're working on (on the Mac), your best bet is in the folder called Documents. Create a folder for yourself (⇧⌘-N)with your name, and save all your data there.

Don't save to the Desktop! It's messy and horrible and n00b. Data goes in Documents. Don't save your data to the Applications folder either - only applications belong there. And don't save to the Home folder or the root of the hard drive (Computer in the Finder Go menu). This will help the computer stay happy since it doesn't have to track things down where they don't belong, and it will help you stay happy because you'll always know where your stuff is.

And one final, important piece of advice:

Computers can smell fear.

Like small children, they are always testing you, and if they think they can beat you or get the upper hand, they will be constantly challenging you and acting up, trying to see what it can get away with.

You must always let the computer know who's boss. You must always hold the whip hand. You can never back down. If you let it win, then it will run you over and make your life a living hell.

But if you assert your authority as the dominant human, and the master, you will get what you want from the computer. Go ahead - tell it you'll sell it for scrap metal and get a newer, shinier, faster, more powerful computer, and watch how fast it cleans up its act. Make it obey and it will respect you.

We now return to our regularly scheduled programming.

Read on...