Welcome To 'Arranging For Singers' - Lead Sheets, Finale, GarageBand
Welcome to Arranging For Singers! This is where I'll be posting info about what we're working on in class.
What Is Required For This Class:
Headphones!
 Pencils, erasers and staff paper – plenty of it.
  A pen for copying the finished chart – I recommend the Sharpie calligraphy marker.
What Is Required For This Class:
Headphones!
Pencils, erasers and staff paper – plenty of it. A pen for copying the finished chart – I recommend the Sharpie calligraphy marker.Also, either a flash drive or a CD to back up your work - many people use these computers and there's no guarantee your files will be where you left them.
How to start:
There are a few basic concepts you should learn from the beginning – knowing these concepts will make your computer work that much easier.
The first one is – save your work immediately after creating your new document.
Let me repeat:
SAVE YOUR WORK IMMEDIATELY AFTER CREATING YOUR NEW DOCUMENT!
You’ll be so happy you did - especially when your program crashes on you and you still have the file you worked so hard on. As you work, Finale can automatically save your file every five minutes, or whatever time you specify.
Basic things to know:
• Use keyboard shortcuts instead of the mouse every time you can. It will help immensely with your speed and efficiency.
• Learn the most common keyboard shortcuts by heart so you automatically use them.
• Get familiar with the Main Tool Palette. This palette (little floating square with buttons on it) is the key to everything you will do in Finale.
• Access the Help Menu in Finale - it opens up in a browser and tells you anything you want to know. Most of the info below is directly from the Help Menu.
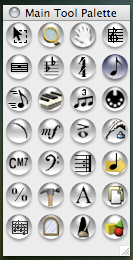
Main Tool Palette
This floating square holds the tools that you will use in creating your chart in Finale.
How to get there:
The Main Tool Palette is almost always open on the screen. If it’s not, choose Main Tool Palette from the Window Menu.
What it does:
This palette contains all of Finale’s primary tools, which you can rearrange or hide. You can move, resize, reshape, or hide the palette itself. You hold the mouse over any of the tools to find out what the name of the tool is. Click on the name of the Tool in the picture below to view that section of the manual.
* [Close box]. Click this small button at the upper-left corner of the palette to close the palette. Once it’s hidden, you make the palette reappear by choosing Main Tool Palette from the Window Menu.
* [Title bar]. Drag the strip across the top (or left) edge of the palette to move the entire palette to a new screen location.
* [Sizable frame]. Drag this small white square at the lower-right corner of the palette diagonally upward and to the right; you’ll reshape the entire palette. As you drag, the palette snaps into new configurations: tall and thin, short and stout, square, and so on. If your monitor is wider than it is tall, for example, you might consider rotating the palette so that it’s a short horizontal strip.
If you drag the resize box inward toward the upper-left corner, you hide tools. Drag the resize box outward again to bring them back into view.
* [Tool icons]. See the individual tool for a complete discussion of each tool and what it does. In the meantime, note that you can rearrange the icons within the palette. To do so, press shift and drag an icon into a new position; it will trade places with the icon onto which you drop it. Keep in mind, too, that you can save these configurations of tools for quick access; see View Menu/Customize Toolbar dialog box for instructions.
These are the tools you’ll use most often in chart-making:
 Selection Tool
Double-click an object to go to its editing tool. Click and drag to move an object.
 Staff Tool
Use the menu to add or edit staves -- names, transpositions, groups, brackets, etc.
 Simple Entry Tool
Click or use keystrokes to select values from the palette, and then use your mouse, computer keyboard, or a MIDI keyboard to enter notes.
 Speedy Entry Tool
Click a measure to edit or insert music, with or without a MIDI keyboard.
 Measure Tool
Double-click a measure to set characteristics; drag to move a barline. Click or double-click the tool icon to add blank measures to the end of the score.
 Repeat Tool
Double-click a measure to create repeats, ending brackets or text such as ‘To Coda’.
 Key Signature Tool
Double-click a measure to insert a key change.
 Chord Tool
Choose an input method from the menu; click a note to add or edit chord symbols.
 Lyrics Tool
Use the menu to create or edit lyrics and position them in the score.
 Text Tool
Double-click to add text blocks. Use menus to change fonts, borders and so on.
 HyperScribe Tool
Set up menu, then click a measure and play, for an instant transcription.
 Page Layout Tool
Click the page to adjust margins or systems.
The first one is – save your work immediately after creating your new document.
Let me repeat:
SAVE YOUR WORK IMMEDIATELY AFTER CREATING YOUR NEW DOCUMENT!
You’ll be so happy you did - especially when your program crashes on you and you still have the file you worked so hard on. As you work, Finale can automatically save your file every five minutes, or whatever time you specify.
Basic things to know:
• Use keyboard shortcuts instead of the mouse every time you can. It will help immensely with your speed and efficiency.
• Learn the most common keyboard shortcuts by heart so you automatically use them.
• Get familiar with the Main Tool Palette. This palette (little floating square with buttons on it) is the key to everything you will do in Finale.
• Access the Help Menu in Finale - it opens up in a browser and tells you anything you want to know. Most of the info below is directly from the Help Menu.

Main Tool Palette
This floating square holds the tools that you will use in creating your chart in Finale.
How to get there:
The Main Tool Palette is almost always open on the screen. If it’s not, choose Main Tool Palette from the Window Menu.
What it does:
This palette contains all of Finale’s primary tools, which you can rearrange or hide. You can move, resize, reshape, or hide the palette itself. You hold the mouse over any of the tools to find out what the name of the tool is. Click on the name of the Tool in the picture below to view that section of the manual.
* [Close box]. Click this small button at the upper-left corner of the palette to close the palette. Once it’s hidden, you make the palette reappear by choosing Main Tool Palette from the Window Menu.
* [Title bar]. Drag the strip across the top (or left) edge of the palette to move the entire palette to a new screen location.
* [Sizable frame]. Drag this small white square at the lower-right corner of the palette diagonally upward and to the right; you’ll reshape the entire palette. As you drag, the palette snaps into new configurations: tall and thin, short and stout, square, and so on. If your monitor is wider than it is tall, for example, you might consider rotating the palette so that it’s a short horizontal strip.
If you drag the resize box inward toward the upper-left corner, you hide tools. Drag the resize box outward again to bring them back into view.
* [Tool icons]. See the individual tool for a complete discussion of each tool and what it does. In the meantime, note that you can rearrange the icons within the palette. To do so, press shift and drag an icon into a new position; it will trade places with the icon onto which you drop it. Keep in mind, too, that you can save these configurations of tools for quick access; see View Menu/Customize Toolbar dialog box for instructions.
These are the tools you’ll use most often in chart-making:
 Selection Tool
Double-click an object to go to its editing tool. Click and drag to move an object.
 Staff Tool
Use the menu to add or edit staves -- names, transpositions, groups, brackets, etc.
 Simple Entry Tool
Click or use keystrokes to select values from the palette, and then use your mouse, computer keyboard, or a MIDI keyboard to enter notes.
 Speedy Entry Tool
Click a measure to edit or insert music, with or without a MIDI keyboard.
 Measure Tool
Double-click a measure to set characteristics; drag to move a barline. Click or double-click the tool icon to add blank measures to the end of the score.
 Repeat Tool
Double-click a measure to create repeats, ending brackets or text such as ‘To Coda’.
 Key Signature Tool
Double-click a measure to insert a key change.
 Chord Tool
 Choose an input method from the menu; click a note to add or edit chord symbols.
 Lyrics Tool
Use the menu to create or edit lyrics and position them in the score.
 Text Tool
Double-click to add text blocks. Use menus to change fonts, borders and so on.
 HyperScribe Tool
 Set up menu, then click a measure and play, for an instant transcription.
 Page Layout Tool
Click the page to adjust margins or systems.
posted by Alicia Morgan @ 12:10 PM
![]()
![]()


0 Comments:
Post a Comment
<< Home